How to Create a Visio Engineering Drawing Template
A drawing template should do more than provide a layout. It should improve consistency, support standardization, reduce manual rework, and strengthen document control across the full drawing set.
This guide walks through a practical method for building a Visio engineering drawing template that supports reusable title blocks, background pages, automated page numbering, revision management, and document-level metadata. The objective is not simply to make drawings look consistent. It is to create a controlled, repeatable structure that is easier to maintain as the technical baseline evolves.
Objective
Build a Visio drawing template that:
Establishes a consistent sheet structure
Supports reusable title blocks and revision elements
Automates page numbering
Centralizes metadata
Improves maintainability and document control
Why It Matters
In many engineering environments, drawing quality degrades gradually through small inconsistencies that appear minor at first but create larger downstream problems. Common examples include inconsistent fonts, border thicknesses, field formatting, drawing numbers, and sheet numbering. Over time, those inconsistencies increase review effort, introduce avoidable errors, and make updates more difficult to control.
A well-structured template addresses those issues at the source. It helps establish a consistent visual and technical baseline, reduces repeated manual edits, improves maintainability as the drawing package grows, supports configuration control, and enables more repeatable workflows across future drawings.
This becomes even more valuable when a drawing package expands beyond a small number of sheets, because the effort required for manual updates scales with the number of pages, while a properly structured template keeps those updates centralized.
Before You Begin
Before building any reusable content, define what the template must control. At a minimum, identify:
Required title block fields
Drawing identifier format
Page numbering convention
Revision convention
Required background layout elements
Which metadata should be entered once and reused throughout the drawing
That upfront definition reduces rework later and helps ensure the template reflects your documentation standard rather than a one-off layout.
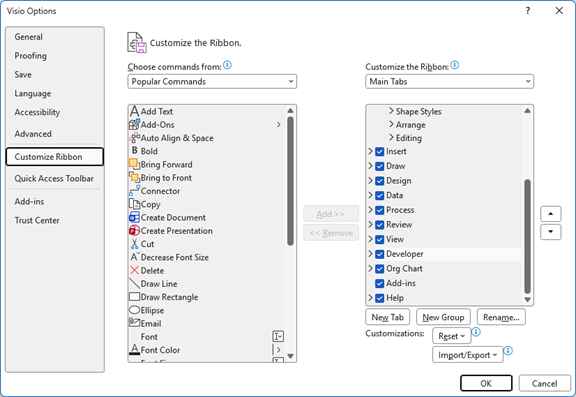
Step 1: Enable the Developer Tab
The Developer tab provides access to the Visio capabilities used throughout this workflow. You will use the Developer tab throughout the template build, so enable it before setting up the drawing structure.
Create blank drawing (open Visio → Blank Drawing → Create)
Enable Developer tab (File → Options → Customize Ribbon → Developer = checked → OK)
Step 2: Configure the Baseline Drawing Settings
Configure the drawing so it remains compact while still readable when printed on letter-size paper. Adjust the settings as needed to match your drawing standard, page format, and application. This creates a more controlled baseline and reduces the need to repeatedly correct formatting later.
Set default font and shape settings (under Developer tab (Show/Hide section), Drawing Explorer = checked → under Styles, right-click on Theme → Define Styles... → Text... → set desired Font and Font Size → OK → Shape... → under Line, Width = 0, Begin Arrow size = Very Small, and End Arrow size = Very Small → OK → OK)
Close Drawing Explorer task pane
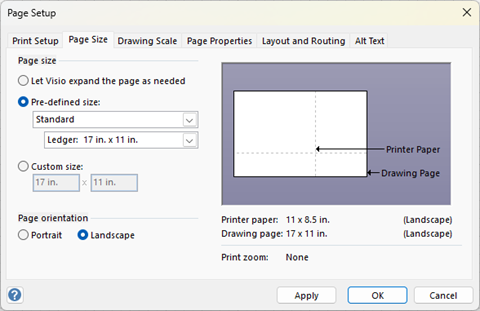
Step 3: Configure Page Setup
Set up the page structure before adding the border elements. Use the settings that align with your drawing standard and print requirements.
Configure page size settings (under Design tab (Page Setup section), Orientation = Landscape → Size → More Page Sizes… → configure Page Size tab per figure below → OK)
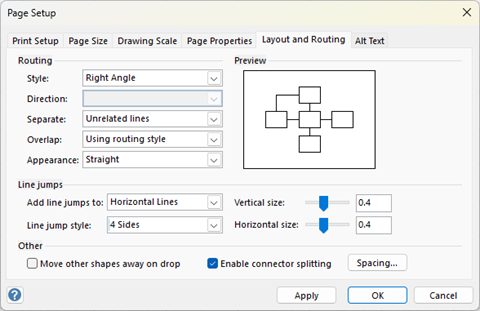
- Configure layout and routing settings (under Design tab (Page Setup section), press Size → More Page Sizes… → configure Layout and Routing tab per figure below → OK)
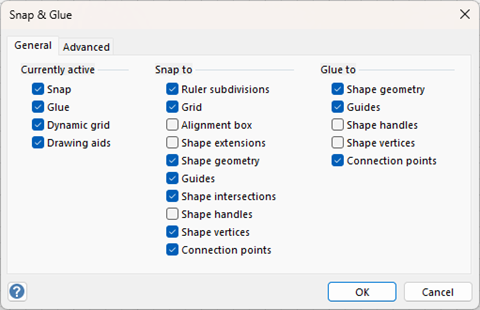
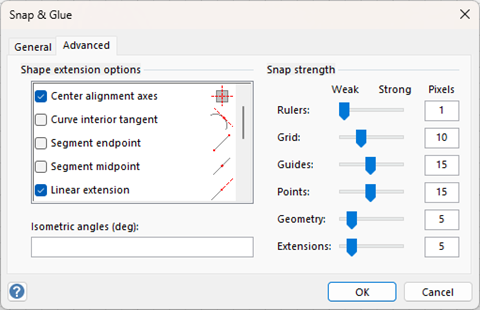
Step 4: Configure Snap and Glue
Use settings that support controlled alignment and repeatable placement of drawing elements. In practice, tighter snap behavior is useful when building borders, title blocks, and repeated structural elements that must remain aligned across background pages.
Configure snap and glue settings (Alt+F9 → configure General and Advanced tabs per figures below → OK)
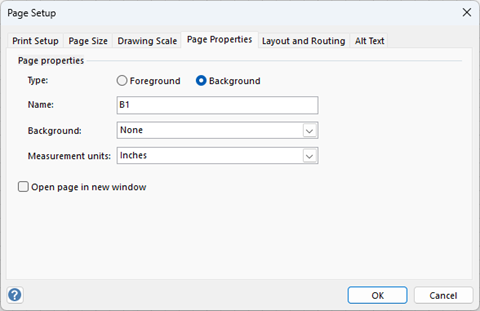
Step 5: Create the First Sheet Background Page
Background pages help separate reusable layout elements from sheet-specific content. That structure improves control and makes future updates easier to apply consistently.
Create background page (right-click on Page-1 (or last page) → Insert → Type = Background → Name = desired name (e.g., "B1") → Background = None → Measurement units = inches → OK)
Step 6: Add Zones and Frame
At this stage, focus on establishing the boundary structure first. Do not over-customize the page before the reusable title block strategy is in place.
Open shapes task pane (under View tab (Show section), press Task Panes → Shapes)
Display Title Blocks stencil on Shapes task pane (from Shapes task pane, press More Shapes → Visio Extras → Title Blocks)
Add zones (from Shapes task pane (Title Blocks), drag-and-drop Zones - 8 shape onto page → adjust Zone Thickness by moving bottom-left Control Point left/right (as desired) → change font size (as desired))
Add frame (from Shapes task pane (Title Blocks), drag-and-drop Frame shape onto page)
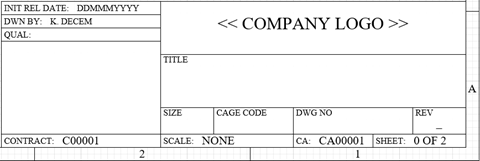
Step 7: Create the Primary Title Block
For document properties to propagate reliably, build the title block structure in this order: (1) create the master shape; (2) link the metadata to the master shape; (3) add the master shape on the background page. That order matters. If the structure is built inconsistently, metadata propagation becomes less dependable and more difficult to maintain.
Add title block shape to background page (from Shapes task pane (Title Blocks), drag-and-drop Block - side label shape onto page)
Set default shape settings (under Developer tab (Show/Hide section), Drawing Explorer = checked → under Styles, right-click on Block → Define Styles... → Shape... → under Line, Width = 0 → OK → OK)
Close Drawing Explorer task pane
Open Size & Position task pane (under View tab (Show section), press Task Panes → Size & Position)
Change shape’s size, font size, and text alignment (as desired)
Below are some additional steps that may be helpful.
- Create an additional shape from the existing one (select shape → Ctrl+D → change shape text & move it to desired position)
- When using the Block - top label shape, reducing its height may cause the text to appear outside the lower border—if that happens, correct it by adjusting the line spacing (select Block - top label shape → F11 → under Paragraph tab, Spacing Line = 100% → OK)
- It's good practice to rename shapes (select shape → under Developer tab (Shape Design section), press Shape Name → Name = desired name → OK)
Step 8: Add the Title Block to the Document Stencil
This converts the title block from a page-specific object into a reusable master. Master shapes support consistency and make future updates easier to manage.
Group title block (select entire title block → Ctrl+G)
Rename title block (select title block → under Developer tab (Shape Design section), press Shape Name → Name = desired name (e.g., "Title Block 1") → OK)
Enable Document Stencil (under Developer tab (Show/Hide section), Document Stencil = checked)
Delete all shapes currently in Document Stencil
Add title block to Document Stencil (drag-and-drop title block from page onto Document Stencil → change Master shape name (e.g., "Title Block 1"))
Step 9: Link Title Block Fields to Document Properties
Before you finalize the title block, decide which fields are:
Document-level and entered once
Page-level and updated automatically
Revision-level and controlled separately
That separation prevents users from entering the same information in multiple places and reduces configuration drift across the drawing set.
Configure property field (in Document Stencil, double-click on desired Master shape (e.g., “Title Block 1”) → double-click on desired field (e.g., "DWG NO") → under Insert tab (Text section), press Field → Category = Document Info → Field name = Subject → OK)
Configure remaining property fields:
DWN BY: Field name = Creator
TITLE: Field name = Title
CAGE CODE: Field name = Company
- Save changes (close shape's window → Yes)
Step 10: Automate Page Numbering
Automated page numbering is one of the highest-value elements in the template because it removes repeated edits across the drawing package. This is done by replacing manually entered sheet data with page fields.
Configure property field (in Document Stencil, double-click on desired Master shape (e.g., “Title Block 1”) → double-click on SHEET: → select page number (i.e., "0") → under Insert tab (Text section), press Field → Category = Page Info → Field name = Page Number → OK → select number of pages → under Insert tab (Text section), press Field → Category = Page Info → Field name = Number of Pages → OK)
Save changes (close shape's window → Yes)
Step 11: Place the Title Block on the Background Page
Add title block to background page (from Document Stencil, drag-and-drop title block shape onto page)
Move title block to desired position
Step 12: Create the Revision Block
Do not overload the revision block with nonessential fields. A revision block is most effective when it clearly communicates only the information required for revision control and review. Excessive detail reduces readability and makes updates less efficient.
Add revision block shapes to background page (from Shapes task pane (Title Blocks), drag-and-drop Section header shapes onto page → change size, font size, and text alignment (as desired))
Group revision block (select entire revision block → Ctrl+G)
Rename revision block (select title block → under Developer tab (Shape Design section), press Shape Name → Name = desired name (e.g., "Revision Block") → OK)
Delete Section header master shape in Document Stencil
Add title block to Document Stencil (drag-and-drop revision block from page onto Document Stencil → change Master shape name (e.g., "Revision Block"))
Add revision block to background page (from Document Stencil, drag-and-drop revision block shape onto page)
Move revision block to desired position

Below are some additional steps that may be helpful.
- Create an additional shape from the existing one (select shape → Ctrl+D → change shape text & move it to desired position)
- It's good practice to rename shapes (select shape → under Developer tab (Shape Design section), press Shape Name → Name = desired name → OK)
Step 13: Create a Reusable Revision Shape
Reusable revision shapes are useful when a consistent revision callout or revision-entry element is needed throughout the drawing set.
Add revision shape to background page (Ctrl+8 → add rectangle to page → change size, font size, and text alignment (as desired) → Ctrl+1)
Rename revision shape (select revision shape → under Developer tab (Shape Design section), press Shape Name → Name = desired name (e.g., "Revision") → OK)
Add revision shape to Document Stencil (drag-and-drop revision shape from page onto Document Stencil → change Master shape name (e.g., "Revision"))
Add revision shape to background page (from Document Stencil, drag-and-drop revision shape onto page)
Step 14: Create the Follow-On Sheet Background Page
If your drawing packages typically include different sheet roles, such as main, continuation, interface, or detail, define those roles early and create separate background variants only where the structure truly differs.
Create background page (right-click on B1 → Duplicate → rename it (e.g., "B2"))
Ungroup title block (select title block → Ctrl+Shift+U → OK)
Delete unwanted shapes
Group title block (select entire revision block → Ctrl+G)
Rename revision block (select title block → under Developer tab (Shape Design section), press Shape Name → Name = desired name (e.g., "Title Block 2") → OK)
Add title block to Document Stencil (drag-and-drop title block from page onto Document Stencil → change Master shape name (e.g., "Title Block 2"))
Add title block to background page (from Document Stencil, drag-and-drop title block shape onto page)
Move title block to desired position

Step 15: Protect the Background Pages
Protection is especially important once the background has been positioned correctly, because even small unintended shifts can create inconsistencies across multiple sheets.
Lock background page from accidental moves and changes (Ctrl+A → under Developer tab (Shape Design section), press Protection → None → OK → Protection → All → OK → OK)
Step 16: Apply Background Pages to the Drawing Sheets
Apply Background page to pages (right-click on page tab → Page Setup... → Background = desired background page → OK)
Create an additional page (right-click on Page-1 → Insert → Background = desired background page → OK)
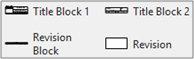
Step 17: Clean Up the Shapes Task Pane
Delete unwanted master shapes from Document Stencil (in Document Stencil, delete all shapes except what's shown below)
- Close Title Blocks stencil (right-click on Title Blocks stencil → Close)
Step 18: Add a Revision Field to the Document ShapeSheet
When default document properties are not sufficient, add custom user-defined cells to the document ShapeSheet. Use the document ShapeSheet for values that must remain centralized and reusable across the drawing but are not well covered by the standard document property fields. This is useful for controlled data such as:
Controlled metadata used in multiple title block fields
Internal status fields
Revision identifiers
Special program identifiers
Add revision to document's ShapeSheet (under Developer tab (Shape Design section), press Show ShapeSheet → Document → in ShapeSheet window (User-defined Cells section), right-click on any existing row → Insert Row → rename user-defined cell [click on cell that starts with "User.Row_" → enter desired name (e.g., "Rev") → Enter] → Value = latest revision (e.g., "–") → close ShapeSheet window)
Update title block Master shapes (in Document stencil, double-click on desired Master shape (e.g., Title Block 1 and Title Block 2) → double-click on REV to select desired text (e.g., "–") → under Insert tab (Text section), press Field → Category = Custom Formula → Custom formula = TheDoc!User.Rev → OK → close Master shape window → Yes)
Step 19: Save the Drawing as a Template
Store the template in a location that supports controlled reuse. If the template is intended for team use, manage distribution through an approved repository or configuration-controlled location rather than allowing multiple uncontrolled local variants.
Save drawing as template (File → Save As → Browse → navigate to desired directory (e.g., %appdata%\Microsoft\Templates) → File name = desired name (e.g., "Visio Drawing Template") → Save as type = Visio Template → Save)
Step 20: Create a New Drawing from the Template
Because the title block fields are already linked to document-level information, the entered values can propagate throughout the drawing as intended.
Create Visio drawing (open Visio → More templates → Personal → Visio Drawing Template → Create)
Change document properties (under Developer tab (Controls section), press Properties → change properties to be used throughout document (e.g., Category (i.e., drawing type—e.g., "RACK ASSY"), Company (i.e., CAGE code), Creator, Description, Subject (i.e., drawing number), Title))
Save Visio drawing (File → Save As → Browse → navigate to desired directory → File name = desired name → Save)
Implementation Recommendations
To get the most value from this template, apply a few operating principles.
Keep masters authoritative: Update the master shapes in the Document Stencil rather than modifying individual page instances whenever possible
Minimize manual overrides: Avoid local formatting overrides on individual sheets—these are a common source of inconsistency and rework.
Standardize metadata ownership: Define who is responsible for entering and approving document-level metadata, such as drawing number, title, and revision.
Validate the template with a multi-sheet test: Before releasing the template, create a small test drawing with several pages and confirm that:
Page numbers update correctly
Total page count is correct
Title block fields propagate as expected
Revision data appears correctly
Background pages remain protected
Control template changes: Treat the template itself as a controlled engineering artifact. If it supports program documentation, changes to the template should be reviewed and versioned with the same discipline applied to other baseline documentation.
Result
You now have a Visio drawing template that supports:
Consistent formatting
Reusable title blocks
Automated page numbering
Centralized metadata
Revision control
Improved maintainability
More repeatable drawing workflows
More importantly, you now have a template structure that supports disciplined execution. Instead of repeatedly correcting formatting and sheet data across the drawing package, you can update controlled information at the source and maintain alignment as the design evolves.
Final Thought
The strongest templates do not simply make drawings look cleaner. They reduce ambiguity, improve control, and make sound engineering execution easier to sustain. That is where simplicity provides the most value: not by removing rigor, but by strengthening it through structure, consistency, and disciplined reuse.