
Creating reusable shapes and custom stencils in Microsoft Visio can improve drawing consistency, reduce repeated work, and make engineering drawings easier to maintain. Instead of recreating or reformatting the same drawing elements each time they are needed, you can define standardized master shapes, organize them into custom stencils, and reuse them throughout a drawing or across multiple drawing files.
This guide walks through a practical method for creating reusable Visio shapes and stencils, including master shapes, connection points, the Document stencil, master updates, and stencil organization. The objective is not simply to build a convenient shape library; it is to establish reusable drawing elements that can be standardized, maintained, and controlled as engineering documentation evolves.
Objective
Create a reusable Visio shape and stencil structure that:
Standardizes frequently used drawing elements
Establishes reusable master shapes
Organizes related master shapes in custom Visio stencils
Supports consistent use of standardized shapes across multiple drawings
Reduces repeated shape creation and formatting
Maintains a clean and organized Document stencil
Allows controlled updates to repeated shape instances within a drawing
Provides a foundation for Shape Data, fields, formulas, and drawing automation
Why It Matters
Engineering drawings often contain repeated elements such as equipment blocks, interfaces, cable elements, labels, and other graphical representations. When those elements are created independently, small differences begin to accumulate. Dimensions change, fonts drift, line weights become inconsistent, connection points move, and labels may be formatted differently. Over time, the same type of component can be represented differently across multiple drawing sheets or files.
Reusable Visio master shapes address this problem at the source. Instead of treating every occurrence as an independent drawing object, Visio allows you to define a master shape and create multiple instances from that master. A custom stencil extends this capability beyond a single drawing by providing a reusable library of related master shapes.
For engineering documentation, the resulting structure is:
Custom Stencil → Document Stencil → Master Shape → Drawing Instance
Each layer serves a different purpose. The custom stencil provides the reusable shape library. The Document stencil contains the master shapes used within the drawing. The master shape establishes the standardized definition, and each drawing instance represents a specific use of that master shape on the page.
Understanding and maintaining this structure improves consistency, reduces unnecessary rework, and provides a stronger foundation for standardization, configuration control, and more advanced Visio automation.
Before You Begin
Before beginning this workflow, configure the Visio Quick Access Toolbar using How to Configure Keyboard Shortcuts in Visio. This tutorial uses the configured Alt key shortcuts to access commonly used Visio commands more efficiently.
Before creating reusable shapes, identify which drawing elements should be standardized. Good candidates typically have one or more of the following characteristics:
Used repeatedly
Expected to follow a consistent graphical standard
Used across multiple drawing sheets or files
Likely to require future updates
Require standardized connection locations
May eventually contain Shape Data, fields, formulas, or other automation
Do not create a master simply because a shape appears more than once. Create a master when repeated objects should represent the same standardized type of drawing element.
Also determine whether the reusable shape belongs in the current drawing only, a custom stencil used across multiple drawings, or a controlled engineering drawing template or reusable shape library. This guide focuses on establishing the shape, master, and stencil architecture first. Shape Data, fields, formulas, and information propagation can then be added separately.
Step 1: Enable the Developer Tab
The Developer tab provides access to the Visio capabilities used throughout this workflow. You will use it to name shapes, access the ShapeSheet, and work with other shape development tools, so enable it before creating reusable shapes and stencils.
Create blank drawing (open Visio → Blank Drawing → Create)
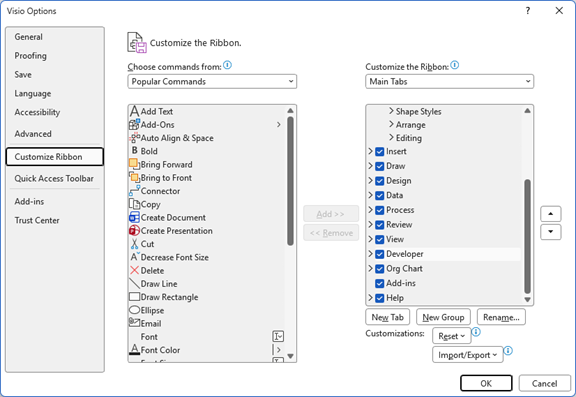
Enable Developer tab (File → Options → Customize Ribbon → Developer = checked → OK)
Step 2: Create a Custom Visio Stencil
A custom stencil provides a reusable library for storing and organizing master shapes. Create the stencil before developing the shape library so each completed master has a defined location.
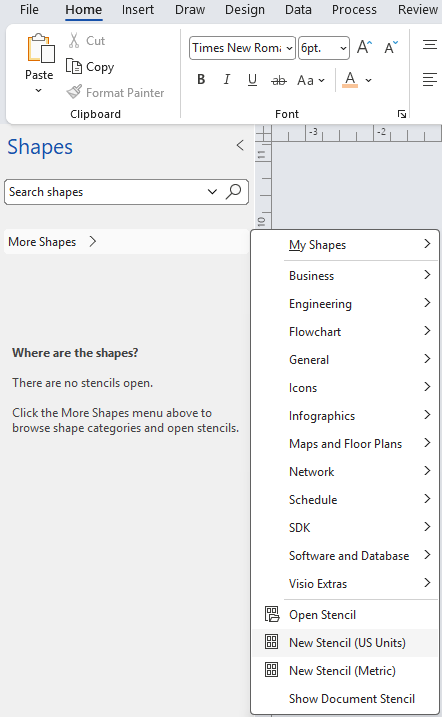
Create new stencil (in Shapes task pane, press More Shapes → New Stencil)
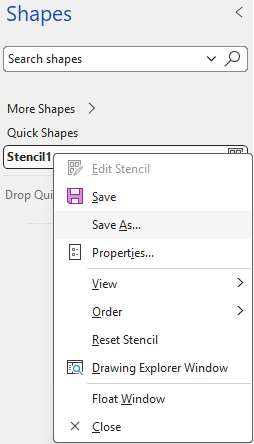
- Save stencil (right-click on stencil → Save As… → enter desired name → Save)
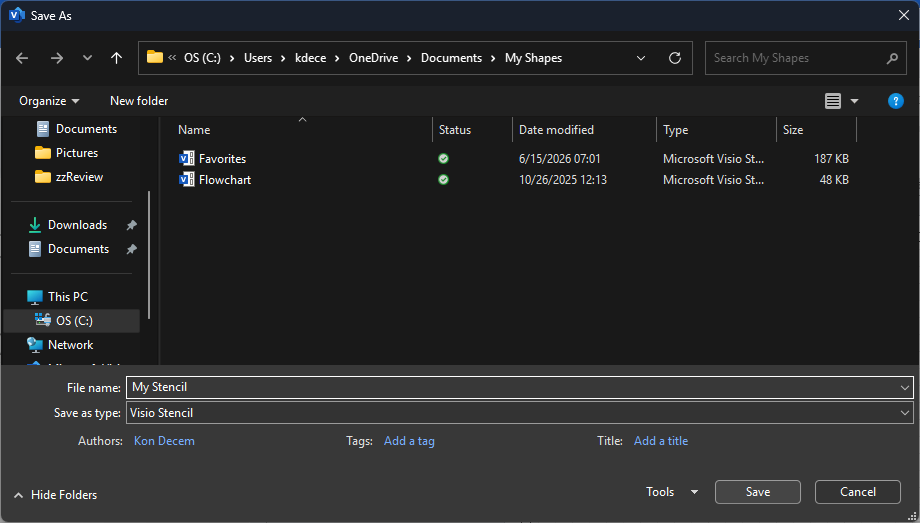
Custom Visio stencils use the .vssx file extension and are typically saved in the My Shapes folder (More Shapes → My Shapes → Organize My Shapes), where they can later be opened from More Shapes → My Shapes.
Step 3: Create the Reusable Shape
Start with an existing Visio shape that closely matches the intended drawing element, then modify it as needed before adding it to the custom stencil. Using an existing shape as a starting point can preserve useful geometry and behavior while allowing you to standardize its appearance and function for your engineering workflow.
Add shape to page (in Shapes task pane, press More Shapes → navigate to and open desired stencil → drag-and-drop desired shape onto page)
Modify shape (select shape → make desired changes—see NOTE below)
Below are some additional steps that may be helpful.
- Change shape size (select shape → Alt+5 → enter desired Width and Height)
- Change shape text font (select shape → under Home tab (Font section), select desired font and font size)
- Change shape text alignment (select shape → under Home tab (Paragraph section), select desired text alignment)
- Change shape format (select shape → F3 → Fill = desired fill type → Line = desired line type → Width = desired border line thickness → Rounding presets = desired corner rounding)
- Change connector shape format (select connector shape → F3 → Line = Solid line → Width = desired connector shape thickness → Rounding size = desired connector shape rounding → Begin Arrow type and End Arrow type = 00 → Begin Arrow size and End Arrow size = Very Small)
- Change shape name (select shape → Alt+1 → Name = desired name → OK)
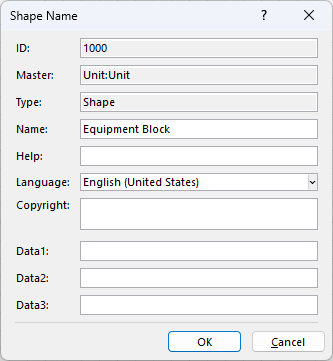
Use a descriptive name based on what the shape represents, such as Equipment Block, Cable Assembly, or Interface Port. Avoid generic names such as Shape 1 or Rectangle 27, because clear naming becomes increasingly important when the shape is added to a stencil, referenced in the ShapeSheet, or used in automation.
If no existing Visio shape provides an appropriate starting point, create the required geometry directly on the drawing page and group the elements as needed before naming the shape.
Step 4: Add Connection Points
Add connection points when the reusable shape requires defined attachment locations for connectors or lines. Standardizing these locations helps keep connections consistent each time the master shape is used.
Add Connection Points (select shape → Ctrl+Shift+1 → hold Ctrl key and click desired locations on shape)
Return to Pointer Tool (Ctrl+1)

Place connection points only where the attachment location has technical meaning. For example, a connection point may represent a physical interface, electrical connection, cable termination, signal input/output, or other defined connection location.
To delete Connection Points (select shape → Ctrl+Shift+1 → hold Shift key and select all unwanted Connection Points → Delete)
Step 5: Add the Shape to the Custom Stencil
Once the reusable shape is configured and named, add it to the custom stencil to create a master shape. Keep the master shape name consistent with the shape name so the reusable library remains easy to understand and maintain.
Add shape to custom stencil (right-click on custom stencil (e.g., "My Stencil") and select Edit Stencil → drag-and-drop shape from page onto custom stencil → change master shape name to be same as shape's name → right-click on custom stencil and select Edit Stencil → Save)
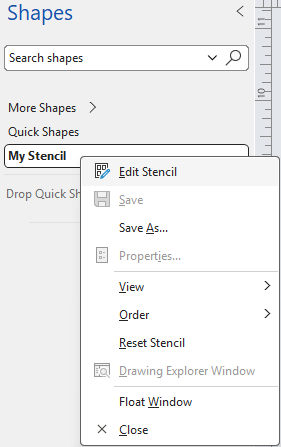
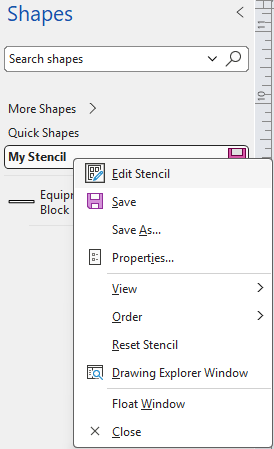
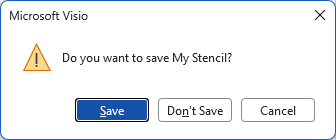
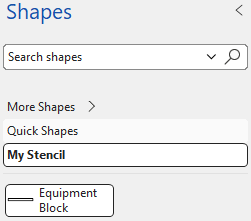
The shape stored in the custom stencil is now a master shape. Future instances can be created by dragging this master shape from the stencil onto a drawing page.
Step 6: Edit the Master Shape
Make changes directly to the master shape when they should become part of the reusable shape definition. Editing the master shape helps keep its size, text font, formatting, connection points, and other standardized characteristics consistent.
Edit master shape (right-click on custom stencil and select Edit Stencil → double-click on desired master shape → in master shape window, select shape → make desired changes → close master shape window → Yes → right-click on custom stencil and select Edit Stencil → Save)
Changes made to a master shape in the custom stencil become part of the reusable shape used for future drawings. Changes made to a master shape in the Document stencil apply to instances of that master shape within the current drawing, provided those characteristics have not been overridden at the instance level.
Step 7: Organize Master Shapes into Separate Stencils
As the reusable shape library grows, organize related master shapes into separate custom stencils so they are easier to locate, maintain, and reuse. For example, separate stencils can be created for Cables, Connectors, Equipment, or other logical shape categories.
Add master shapes to new stencil (open custom stencil—see NOTE in Step 2.2 → hold Ctrl key and select desired master shapes → right-click selected master shapes → Add to My Shapes → Add To New Stencil… → File name = desired name (e.g., Cables, Connectors, Equipment, etc.) → Save)
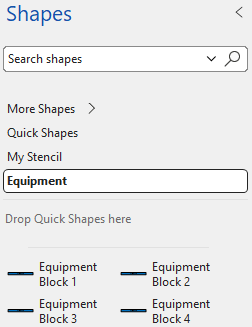
This operation copies the selected master shapes into the new stencil; it does not remove them from the original stencil. If the intent is to completely reorganize the library, verify that the new stencil and its master shapes are correct before removing the corresponding master shapes from the original custom stencil.
Organizing master shapes by function keeps the reusable library easier to navigate and helps prevent a single stencil from becoming unnecessarily large or difficult to maintain.
Step 8: Use Master Shapes in a Drawing
Use master shapes from the custom stencil to create consistent shape instances throughout the drawing. When a master shape is dragged onto a page, Visio automatically adds a copy of that master shape to the drawing's Document stencil.
Add master shape to drawing (in Shapes task pane, navigate to and open desired custom stencil → drag-and-drop desired shape onto page)
Create additional instances as needed (on page, select shape → Ctrl+D)
Each shape placed from the stencil is an instance of the master stored in the drawing's Document stencil. The custom stencil remains the reusable source library, while the Document stencil contains the masters used within the current Visio file.
Because master shapes are automatically added to the Document stencil when introduced into a drawing, keep the Document stencil clean and organized as the drawing package develops.
Step 9: Manage the Document Stencil
Every master shape dragged from a stencil onto a drawing page is automatically added to the Document stencil. If a stencil shape is being used only as a starting point and will be modified before becoming part of the drawing package, replace the temporary master shape with the finalized master shape so the Document stencil contains only the shapes intentionally used by the drawing.
Delete temporary master shape from Document stencil (in Shapes task pane, press More Shapes → Show Document Stencil → select temporary master shape → Delete → OK)
Finalize shape on page (select shape → make desired changes → Alt+1 → Name = desired name → OK)
Add finalized shape to Document stencil (drag-and-drop shape from page onto Document stencil → change master shape name to be same as shape's name)
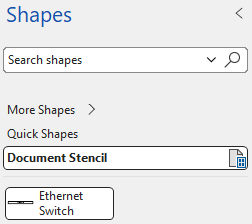
- Create instance from finalized master shape (drag-and-drop master shape from Document stencil onto page)
Use this workflow when an existing stencil shape is being customized before it becomes part of the drawing package. If the original master shape is being used without modification, there is no need to delete and recreate it in the Document stencil.
Keeping the Document stencil limited to intentionally defined master shapes makes the drawing package easier to understand, maintain, and control.
Step 10: Validate the Reusable Shapes and Stencil
Before using the custom stencil in a drawing package, verify that the master shapes behave as intended and that the stencil can be reused in another Visio file.
Verify master shape (drag-and-drop master shape from custom stencil onto page → confirm size, text font, formatting, connection points, and other standardized characteristics)
Verify stencil reuse (open new drawing → in Shapes task pane, press More Shapes → My Shapes → open desired custom stencil → drag-and-drop master shape from custom stencil onto page → confirm intended behavior)
Verify Document stencil (in Shapes task pane, press More Shapes → Show Document Stencil → confirm only intended master shapes are present)
Testing the stencil before broader use helps identify issues with formatting, connection points, naming, or master shape behavior before those issues are repeated throughout a drawing package.
Implementation Recommendations
Apply the following practices when maintaining reusable Visio shapes and custom stencils:
Use consistent naming: Give shapes and master shapes clear, descriptive names and keep the shape name and corresponding master shape name consistent
Organize stencils by purpose: Group related master shapes into logical stencils, such as Cables, Connectors, or Equipment, rather than allowing one stencil to become unnecessarily large
Maintain the master shape as the standardized source: Make common changes to the master shape rather than modifying individual instances when the characteristics should remain consistent
Keep instance-specific information separate: Modify individual shape instances only when information or behavior legitimately needs to vary within the drawing
Keep the Document stencil clean: Remove temporary, obsolete, or unintended master shapes so the drawing contains only the master shapes required for the drawing package
Avoid uncontrolled stencil copies: Maintain an authoritative version of each custom stencil rather than allowing multiple independent copies to evolve separately
Apply configuration control: When custom stencils become part of a standardized engineering workflow, manage changes and released versions deliberately
Validate changes before broader use: After modifying a master shape or stencil, confirm that the resulting shapes, connection points, formatting, and behavior remain correct before using them throughout a drawing package
Plan for future automation: Well-structured master shapes provide a foundation for Shape Data, fields, formulas, and information propagation
The search box in the Shapes task pane retains previous searches. If you prefer to clear unwanted search history entries, remove them from the Windows Registry (close Visio → ⊞+R → type regedit → Enter → Yes → navigate to Computer\HKEY_CURRENT_USER\Software\Microsoft\Office\16.0\Visio\Shape Gallery\History → select unwanted entries (except "(Default)") → Delete → Yes → close Registry Editor window).
Editing the Windows Registry can affect application behavior. Delete only the unwanted Visio Shape Gallery history entries described above.
Result
You now have a reusable Visio shape and stencil structure that supports:
Standardized master shapes
Reusable engineering drawing elements
Custom Visio stencils
Consistent shape formatting and connection points
Organized Document stencil
Controlled updates to reusable shapes
Reuse across multiple Visio drawings
A foundation for Shape Data, fields, formulas, and information propagation
The resulting structure is:
Custom Stencil → Document Stencil → Master Shape → Drawing Instance
This approach reduces repeated work, improves consistency, and makes reusable drawing content easier to maintain as the drawing package evolves.
Final Thought
Reusable shapes and stencils in Visio help reduce repeated work, improve consistency, and make drawing content easier to maintain. The objective is not simply to recreate the same shape more efficiently; it is to define it once, reuse it consistently, and maintain it from the appropriate source.